vue萌新(流行开发套路)

用自动化构建方式commenjs规范写vuejs

首先创建合理的项目开发目录结构
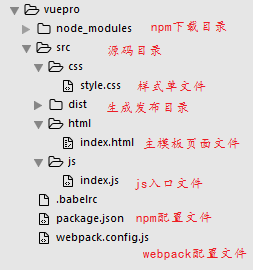
目录结构

初始化 package.json 文件和创建 .babelrc 编译es2015语法文件,以及npm 安装vue相关插件

1
npm install vue webpack babel-cli babel-loader babel-preset-es2015 html-webpack-plugin --save-dev

先装这些,以后继续添加,webpack 不建议全局安装,版本更新问题

package.json

1
2
3
4
5
6
7
8
9
10
11
12
13
14
15
16
17
18
19
20
21
22
23
24
25
26
27
28
29
30
31
32
33
{
"name": "vuepro",
"version": "1.0.0",
"description": "",
"main": "index.js",
"scripts": {
"build": "webpack",
"dev": "webpack-dev-server --inline --hot --content-base ./src/dist"
},
"author": "hao",
"license": "ISC",
"devDependencies": {
"babel-cli": "^6.22.2",
"babel-loader": "^6.2.10",
"babel-preset-es2015": "^6.22.0",
"babel-preset-stage-2": "^6.22.0",
"css-loader": "^0.26.1",
"element-ui": "^1.1.6",
"file-loader": "^0.10.0",
"html-webpack-plugin": "^2.26.0",
"style-loader": "^0.13.1",
"vue": "^2.1.10",
"vue-loader": "^10.1.2",
"vue-resource": "^1.1.1",
"vue-router": "^2.2.0",
"vue-template-compiler": "^2.1.10",
"vuex": "^2.1.1",
"webpack": "^1.14.0",
"webpack-dev-server": "^1.16.2"
}
}
//这仅仅是 package.json 样例

webpack.config.js

1
2
3
4
5
6
7
8
9
10
11
12
13
14
15
16
17
18
19
20
21
22
23
24
25
26
27
28
29
30
31
32
33
34
35
36
37
38
39
40
41
42
var HtmlWebpackPlugin = require("html-webpack-plugin"); //加载插件
var webpack = require("webpack"); //加载webpack
module.exports = {
entry:{
// "index":__dirname+"/src/js/index.js" //设置入口js文件
"index":[__dirname+"/src/js/index.js", //热加载配置
"webpack-dev-server/client?http://127.0.0.1:8080"]
},
output:{
publicPath:"http://127.0.0.1:8080/",
path:__dirname+"/src/dist/js", //输出文件路径
filename:"[name].js" //输出的文件最终以入口文件的名称
},
resolve:{ //设置编译过后文件 vue指向vue.js 文件
alias:{
vue:"vue/dist/vue.js"
}
},
module:{
loaders:[
{test: /\.css$/,loader:'style!css'}, //设置渲染css
{test: /\.(png|jpe?g|gif|svg)(\?\S*)?$/,loader: 'file',query: {name: '[name].[ext]?[hash]'}}, //图片渲染
{test:/\.js$/,loader:"babel",query:{compact:true}}, //es2015语法 babel转化
{test:/\.vue$/,loader:"babel!vue", exclude:"/node_modules/"},
{test:/\.(eot|woff|woff2|svg|ttf)([\?]?.*)$/,loader:"file" }
]
},
plugins:[
new HtmlWebpackPlugin({
//filename:__dirname+"/src/dist/index.html", //目标文件
filename:"index.html",
template:__dirname+"/src/html/index.html", //模板文件
inject:"body", //js注入位置
hash:true, //注入js增加随机hash
chunks:["index"] //注入哪一个js文件
})
]
}
//这仅仅是 webpack.config.js配置文件 样例

.babelrc

1
2
3
4
5
{
"presets":["es2015"]
}
// .babelrc 是固定文件名,设置es2015编译语法的配置文件

接下来就可以开始正式写页面代码了

src/html/index.html 里面写页面代码,在 src/js/index.js 里面写页面主逻辑

1
2
3
<div id="app">
{{name}}
</div>
1
2
3
4
5
6
7
import Vue from "vue"; //首先导入vue
new Vue({
el:"#app", //绑定渲染元素
data:{
name:"hao"
}
})

package.json 里设置启动webpack

1
2
3
"scripts": {
"build": "webpack -p" //-p 是压缩生成的文件,会有警告信息
}

运行项目

1
$ npm run build

用组件化开发

可复用的结构html代码可以封装成组件的形式,挂载在非body的根节点上

安装vue-loader 并配置可识别.vue 文件

分为全局注册和局部注册

1
2
3
4
$ npm install vue-loader --save-dev
//配置vue-loader
{test:/\.vue$/,loader:"babel!vue", exclude:"/node_modules/"},

html 结构

1
2
3
<div class="container"> //不要直接挂载在body上
<myname></myname>
</div>

全局注册

1
2
3
4
5
6
7
8
9
10
11
12
13
14
15
16
17
18
19
20
Vue.component("myname",{
props:["count"], //组件中不可以改变从父组件中传过来的数据
data(){
return {
inCount:this.count
}
},
template:`
<div><h1 @click:"change">我是一个全局注册的组件{{inCount}}</h1></div>
`,
methods:{
change(){
this.inCount ++;
}
}
})
new Vue({
el:".container",
})

局部注册

方式一

1
2
3
4
5
6
7
8
9
10
11
12
13
14
15
import Vue from "vue";
let myname = {
template:"<div id='me'>my name is {{name}}</div>",
data:()=>{
return {
name :"hao"
}
}
}
new Vue({
el:".container",
components:{
"myname":myname
}
})

方式二 在src目录下创建 components 组件文件夹,新建mycomponents.vue 文件

1
2
3
4
5
6
7
8
9
10
11
12
13
14
15
<style>
#myage{color: green;}
</style>
<template>
<div id="myage">
我的年龄是{{age}}
</div>
</template>
<script>
export default {
data:()=>{
return {age:"18"}
}
}
</script>
1
2
3
4
5
import mynameCom from "./../components/mycomponents.vue";
new Vue({
el:".container", //绑定渲染元素
components:{"myname",mynameCom}
})

父子组件之间的通信

每一个组件都有独立的作用域,通过props 值传递参数

1
2
3
4
5
6
7
8
9
10
11
12
13
14
15
16
17
18
19
20
21
<div class="container">
<myname value="25"></myname>
</div>
——————————————————————————————————————
<style>
#myage{color: green;}
</style>
<template>
<div id="myage">
我的年龄是{{value}}
</div>
</template>
<script>
export default {
props:['value']
data:()=>{
return {age:"18"}
}
}
</script>

Props验证

1
2
3
4
5
6
7
8
9
10
11
12
13
14
15
16
// 对象语法,提供校验
Vue.component('props-demo-advanced', {
props: {
// 只检测类型
height: Number,
// 检测类型 + 其他验证
age: {
type: Number, //验证类型
default: 0, //默认值
required: true, //必填
validator: function (value) { //自定义验证规则函数
return value >= 0
}
}
}
})

子组件访问其相邻的兄弟组件

通过this.$parent.$children 获取其父组件下所有的子组件(数组);可通过数组索引,也可以给子组件增加一个索引id ref:name 访问

1
2
3
<myname ref="uname"></myname>
this.$parent.$refs.uname.$data.username //获取到相邻兄弟组件的属性

父子组件嵌套

1
2
3
4
5
6
7
8
9
10
11
12
13
14
15
16
17
18
19
20
21
22
23
24
25
26
27
28
29
30
31
32
33
34
<div class="container">
<me age="25" name="hao"></myname>
</div>
————————————————vue——————————————————————
<template>
<div id="me">
<myname :name="name"></myname> //使用v-bind: 指令动态绑定属性值,简写为:
<myage :age="age"></myage>
</div>
</template>
<script>
import myname from "./myname.vue";
import myage from "./myage.vue";
export default {
props:["name","age"],
components:{
"myname":myname,
"myage":myage
}
}
</script>
————————————————index.js——————————————————————
import me from "./../components/me.vue";
new Vue({
el:".container", //绑定渲染元素
components:{"me",me}
})

webpack配置热加载免刷新

使用webpack-dev-server 是一个小型静态服务器搭建热运行环境,代码修改无需编译和页面刷新进行预览,并不产生任何编译文件,在内存当中运行

安装 webpack-dev-server 并配置

1
2
3
4
5
6
7
8
9
10
11
12
13
14
15
16
17
18
19
20
21
22
23
24
25
26
entry:{
"index":[__dirname+"/src/js/index.js",
"webpack-dev-server/client?http://127.0.0.1:8080"] //配置编译到入口文件当中
},
output:{
publicPath:"http://127.0.0.1:8080/", // 设置访问网站和端口
path:__dirname+"/src/dist/js",
filename:"[name].js"
},
// 可单独配置webpack-dev-server
devServer:{
hot:true,
inline:true,
progress:true,
port:8080
},
plugins:[
new HtmlWebpackPlugin({
//filename:__dirname+"/src/dist/index.html",
filename:"index.html", //更改生成路径,热运行直接加载
template:__dirname+"/src/html/index.html",
inject:"body",
hash:true,
chunks:["index"]
})
]

运行服务

1
2
3
webpack-dev-server --inline --hot --content-base ./src/dist"
// 使用inline模式,--hot 热模块替换 --content-base 指定网站目录路径

使用 webpack –config webpack.dev.config.js 指定要运行的webpack 配置文件

1
2
3
"webpack": "webpack --config webpack.config.js --progress --display-modules --colors --display-reasons"
配置参数,看到打包过程

路由插件

简单理解路由就是单页面应用跳转链接的管理

安装

使用cdn https://unpkg.com/vue-router/dist/vue-router.js 方式加载在vue后面

1
npm install vue-router --save-dev

如果在一个模块化工程中使用它,必须要通过 Vue.use() 明确地安装路由功能:

1
2
3
4
5
//加载路由
import VueRouter from 'vue-router';
//使用路由
Vue.use(VueRouter);

配置路由映射

1
2
3
4
5
6
7
8
9
10
11
12
13
14
15
16
17
18
19
//设置路由
const routes = [
{ path: '/', component: userlogin },
{ path: '/news', component: newslist,name:"newslist" },
{ path: '/newsdetail/:newsid', component: newsdetail,name:"newsdetail" },
{ path: '/login', component: userlogin,name:"userlogin" },
{ path: '/eltable', component: eltable,name:"eltable" },
{ path: '/navbar', component: navbar,name:"navbar" }
]
//初始化路由
const router = new VueRouter({
routes
})
var mv = new Vue({
el:".container",
router:router, //配置router key为固定写法
})

模板中使用

1
2
3
4
<li class="active"><a href="#/login">登录</a></li>
<li><a href="#/news">热点新闻</a></li>
<li><a href="#/eltable">element 测试组件</a></li>
<li><a href="#/navbar">导航 测试组件</a></li>

使用 <router-link> 组件支持用户在具有路由功能的应用中(点击)导航。 通过 to 属性指定目标地址,默认渲染成带有正确链接的 <a> 标签,可以通过配置 tag 属性生成别的标签.。另外,当目标路由成功激活时,链接元素自动设置一个表示激活的 CSS 类名 .router-link-active

1
2
<router-link to="/login">Go to login</router-link>
<router-link :to="{name:'newsdetail',params:{newsid:news.newsid}}"> {{news.title}}</router-link>

使用 <router-view></router-view> 组件是一个 functional 组件,渲染路径匹配到的视图组件。如果 <router-view>设置了名称,则会渲染对应的路由配置中 components 下的相应组件。

任何插件使用先引入然后用Vue.use()

使用 vue-resource ajax请求插件,引入加载之后会在全局注册一个$http 的变量

1
2
3
4
5
6
7
8
// 在生命周期mounted 中设置post请求带参数。
mounted(){
this.$http.post("http://localhost/vue/text.php",{name:"hao"},{emulateJSON:true}).then(function(res){
// alert(res.body);
},function(res){
//error
})
}

ajax获取后台新闻内容展示到页面,在php后端接口数据有newsid 字段,根据这个字段进行传值,用 <router-link> :to 根据命名路由,通过params带有newsid 参数传值。在detail页面初始化生命周期函数里 用get方式接收地址后带有 this.$route.params 的参数,回调对应的条目,赋值到newsdetail 数据中。然后渲染到页面

1
<h2> <router-link :to="{name:'newsdetail',params:{newsid:news.newsid}}"> {{news.title}}</router-link> <small>{{news.pubtime}}</small></h2>

1
2
3
4
5
6
7
8
9
10
11
12
13
14
15
16
created(){
this.$http.get("http://localhost/vue/newslist.php?newsid="+this.$route.params.newsid)
.then(function(res){
this.newsdetail =res.body;
},function(res){
//error
})
},
data(){
return{
newsdetail:{}
}
}
<h2>标题: {{newsdetail.title}}<small>发布时间:{{newsdetail.pubtime}}</small></h2>
<p> {{newsdetail.desc}} </p>

自定义插件

自定义插件的意义在于把业务代码写到插件中,多组件可服用。避免写在组件中显得冗余。

自定义一个插件必须包含一个公开方法 install 这个方法的第一个参数是 Vue 构造器 ,第二个参数是一个可选的选项对象

1
2
3
4
5
export default{
install(Vue,options){
}
}

使用 Vue.prototype 定义插件全局对象方法,在组件中直接 this.$xx 调用

1
2
3
4
Vue.prototype.checkName=(value)=>{
if(!value) return true;
return /\w{6,20}/.test(value)?true:false;
}

在自定义插件中定义自定义指令

使用 v-ckname 绑定指令

1
2
3
4
5
6
7
8
9
10
11
12
13
14
15
16
17
18
19
20
21
22
23
24
25
26
27
28
29
Vue.directive("ckname",{
bind(){
let error = Vue.extend({
template:'<label class="label label-danger">{{message}}</label>',
data(){
return {
message:"用户名不合法"
}
}
})
Vue.errorLabel = (new error()).$mount().$el;
},
update(el,bind,vnode){
if(/\w{6,20}/.test(el.value)){
if(Vue.hasError){
el.parentNode.removeChild(Vue.errorLabel);
Vue.hasError=!Vue.hasError;
}
//vnode.context[bind.expression]=false
}else{
if(!Vue.hasError){
el.parentNode.appendChild(Vue.errorLabel);
Vue.hasError=!Vue.hasError;
}
//vnode.context[bind.expression]=true
}
}
})

使用 extend 创建元素并手动挂载,和创建普通的组件格式一样,然后要实例化,$mount 挂载在元素上

1
2
3
4
5
6
7
8
9
10
11
12
13
14
15
16
17
18
Vue.prototype.errorLabel=null;
let error = Vue.extend({
template:'<label class="label label-danger">{{message}}</label>',
data(){
return {
message:"用户名不合法"
}
}
})
Vue.errorLabel = (new error()).$mount().$el; //$el 返回Vue实例的挂载元素
//然后可以直接 removeChild 到任意节点
update(el,binding,vnode){
el.parentNode.removeChild(Vue.errorLabel);
}

Vuex 状态管理插件

1
2
3
4
5
6
7
8
9
10
11
12
13
14
15
16
17
18
19
20
21
22
23
24
25
26
27
28
import Vuex from "vuex"
Vue.use(Vuex);
const vuex_store = new Vuex.Store({
state: { //保存状态数据
userName:""
},
mutations:{
showUserName(state){ //参数为当前的数据容器名。state
alert(state.username);
}
}
})
var mv = new Vue({
el:".container",
router:router, //配置
store:vuex_store,
})
// 存入到vuex容器的方法
this.$store.state.userName = this.username; //存入到vuex容器state中 的userName属性,直接和vuex交互
//调用 mutations 方法,需要提交commit 调用该方法
this.$store.commit("showUserName");

使用 getters 对原始数据进行过滤

1
2
3
4
5
6
7
8
9
10
11
12
13
<li v-for="news in this.$store.getters.getNews">
state:{
newslist:[],
},
getters:{
getNews(state){
return state.newslist.filter(function(item){
return !item.isdeleted;
})
}
}

Actions 类似于 mutation

Action 函数接受一个与 store 实例具有相同方法和属性的 context 对象,因此你可以调用 context.commit 提交一个 mutation,或者通过 context.state 和 context.getters 来获取 state 和 getters。

可以在 actions 内部执行异步操作

1
2
3
4
5
6
7
8
9
10
11
12
13
14
15
16
actions:{
newslists(context){
fetch("http://localhost/vue/newslist1.php",{
method:"get"
}).then((res)=>{
if(res.ok){
res.json().then((res)=>{
context.commit("setList",res);
console.log(res)
})
}
},function(){
})
}
},

分发 actions 相当于触发mutation

1
this.$store.dispatch("newslists");

Modules 将 store 分割到模块(module)。每个模块拥有自己的 state、mutation、action、getters。

遵循项目结构

1
2
3
4
5
6
7
8
9
10
11
12
13
14
├── index.html
├── main.js
├── api
│ └── ... # 抽取出API请求
├── components
│ ├── App.vue
│ └── ...
└── store
├── index.js # 我们组装模块并导出 store 的地方
├── actions.js # 根级别的 action
├── mutations.js # 根级别的 mutation
└── modules
├── cart.js # 购物车模块
└── products.js # 产品模块

通过导出的形式写单独的一个module模块

1
2
3
4
5
6
7
8
9
10
11
12
13
14
15
16
17
18
19
20
21
22
23
24
25
26
27
28
29
30
31
32
33
export default{
state:{
newslist:[],
},
mutations:{
setList(state,setlist){
state.newslist = setlist;
}
},
actions:{
newslists(context){
fetch("http://localhost/vue/newslist1.php",{
method:"get"
}).then((res)=>{
if(res.ok){
res.json().then((res)=>{
context.commit("setList",res);
console.log(res)
})
}
},function(){
})
}
},
getters:{
getNews(state){
return state.newslist.filter(function(item){
return !item.isdeleted;
})
}
}
}

引用

1
2
3
4
5
6
7
8
import newsmodule from "./../store/modules/NewsModules.js";
const vuex_store = new Vuex.Store({
modules: {
userStore: usermodule, //属性名对应导出的单独模块
newsStore: newsmodule
}
})

修改组件中的调用方法

1
2
3
if(this.$store.state.newsStore.newslist.length==0){ //因为此时的state是各自模块中的,并不是全局的。所以需要在state 后加上对应的模块名
//....
}

使用fecth

1
2
3
4
5
6
7
8
9
10
11
12
fetch("http://localhost/vue/newslist1.php",{
method:"get"
}).then((res)=>{
if(res.ok){
res.json().then((res)=>{
context.commit("setList",res);
console.log(res)
})
}
},function(){
})